

How to import your Splitwise groups into TakeControl, the best Splitwise alternative in 2026
Follow the complete tutorial to export a Splitwise group as a CSV and import its expenses, members, and history into TakeControl.

Switching apps does not have to mean leaving years of expenses, trips, and settlements behind in Splitwise.
TakeControl lets you import a group using the CSV file generated by Splitwise. You export the history, save the file on your phone, and follow a guided flow to create the group, upload the spreadsheet, and organize its members.
This tutorial covers the entire process. The guided flow starts on the TakeControl home screen, while the CSV file is prepared in Splitwise.
Before you begin
Make sure you can access the group in Splitwise, the email account that will receive the export, and the TakeControl app on your phone. Each group must be exported and imported separately.
Why some people are leaving Splitwise
One of the biggest frustrations with Splitwise is the forced timer that can appear between new entries on the free plan. When a group is recording several expenses from a trip, dinner, or shared month, waiting for a countdown interrupts a task that should be quick.
TakeControl appeals to people looking for a more complete mobile workflow for shared expenses. Along with direct CSV history import, it brings together voice entry, receipt scanning, a built-in calculator, group budgets, widgets, offline use, and biometric lock.
For anyone with months or years of shared expenses, the best switch is one that does not make the group start again. Import turns the move into a continuation: your history comes with you, members stay organized, and the next expense can be recorded in a faster workflow.
Import overview
The process has nine steps:
- Open the creation menu on the TakeControl home screen and choose Splitwise import
- Export the Splitwise group as a CSV
- Enter the new group’s details in TakeControl
- Select and upload the CSV file
- Identify which member is you
- Link the other group members
- Review and merge duplicate contacts
- Wait while the file is read and organized
- Review the result and open the imported group
Take a few minutes to check the names and links between members. This review prevents duplicate contacts and keeps the group organized from the start.
1. Start the import from the TakeControl home screen
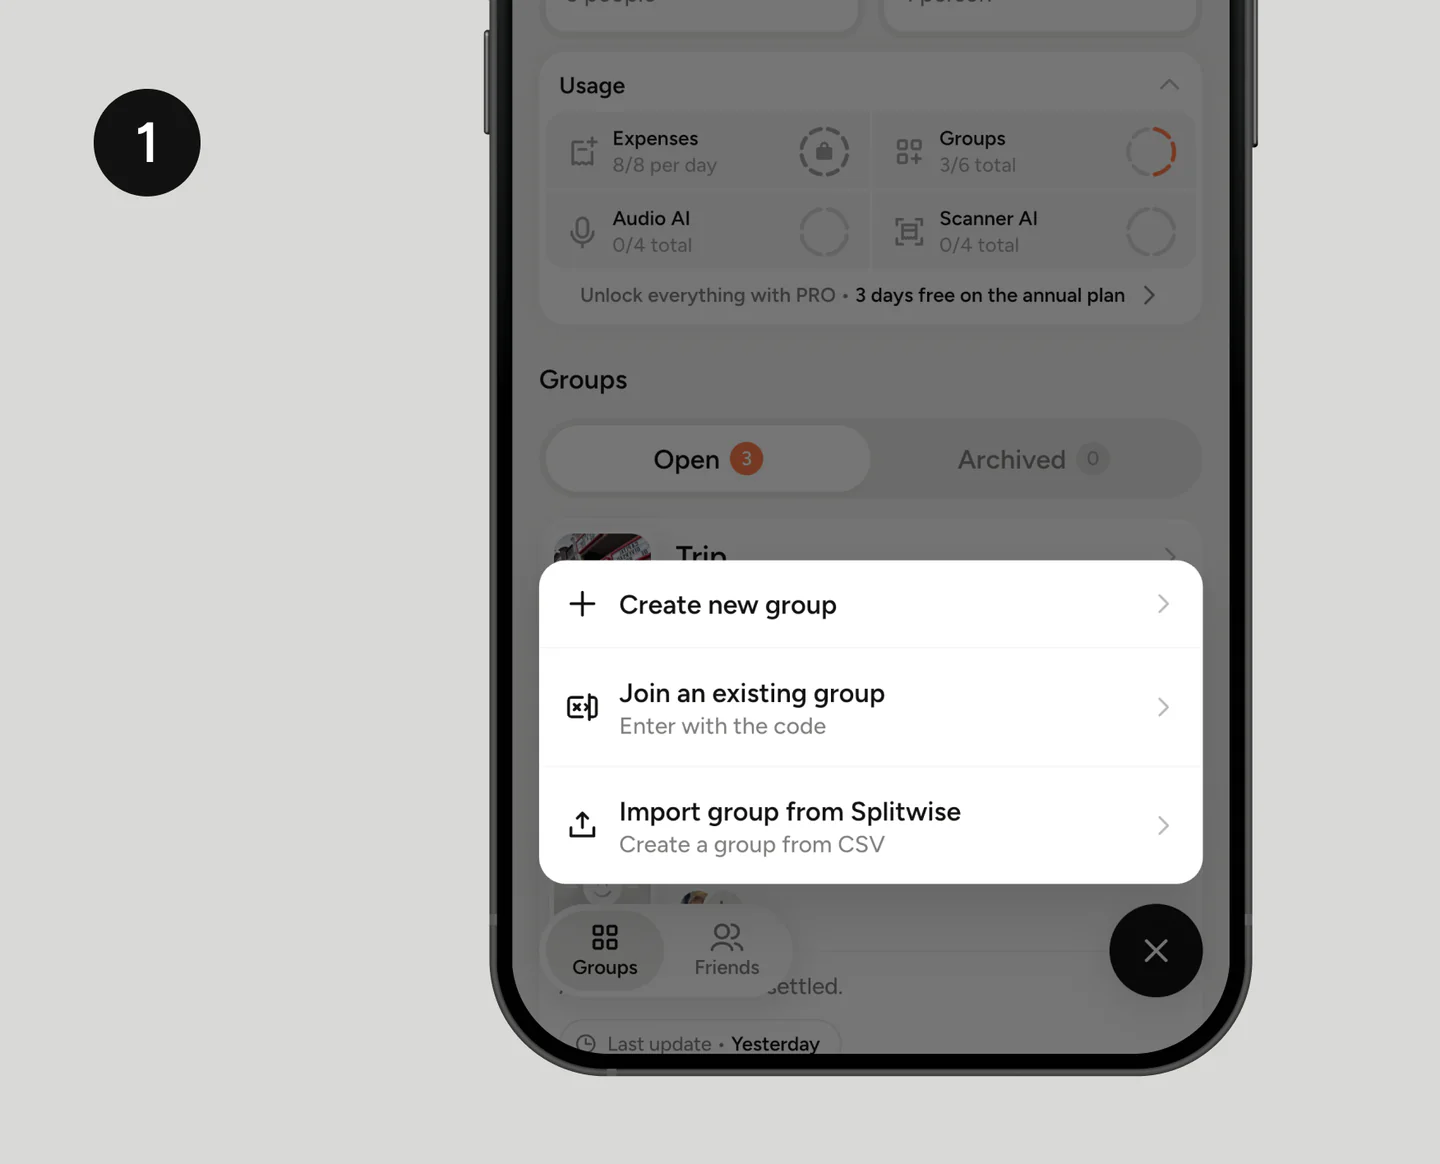
Open TakeControl and stay in the Groups area. Tap the plus (+) button in the bottom-right corner to open the creation menu.
Select Import group from Splitwise. This opens the assistant that guides you through the whole process. Before continuing, make sure you can access the original group and the email account that will receive the export.
2. Export the group from Splitwise
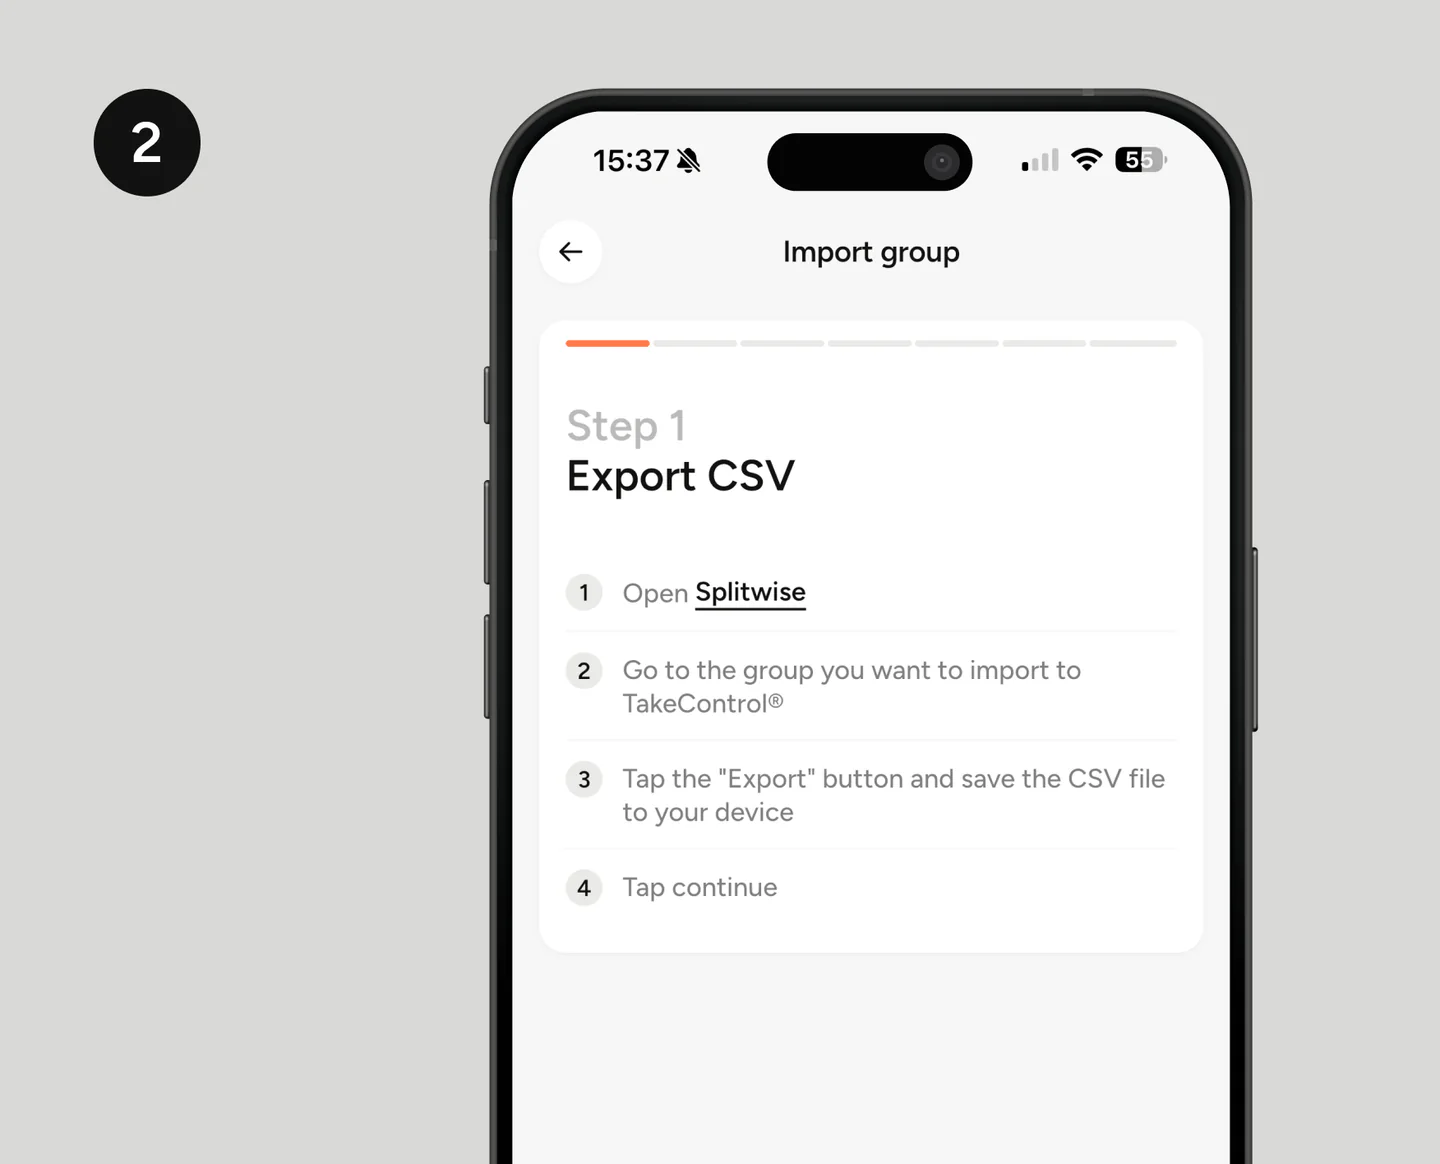
Start in Splitwise. Open the app, go to the group you want to move to TakeControl, and find the option to export the group. Generate the spreadsheet in CSV format and send the file to your email address.
When the message arrives, open the attachment on your phone and save the CSV somewhere easy to find, such as Files, Downloads, or a folder created for the import. Do not edit the spreadsheet: changing columns, headers, or the order of the data may prevent the file from being read correctly.
Once the CSV is saved on your device, return to the TakeControl assistant and tap continue.
3. Enter the group information
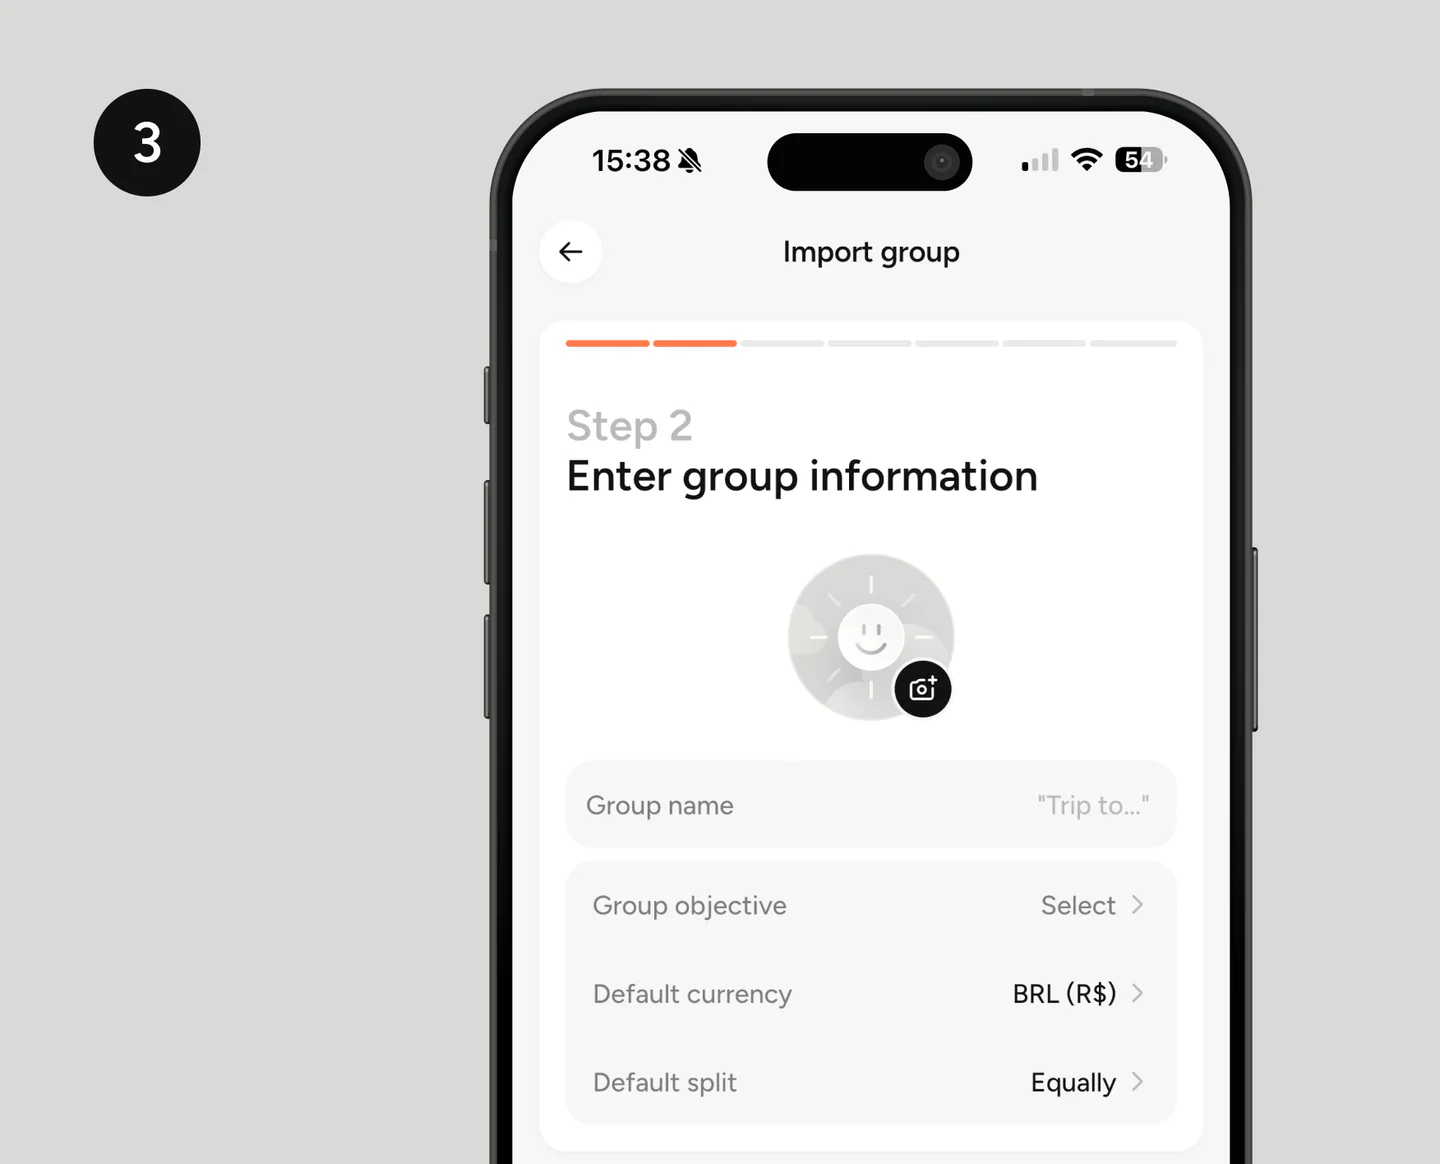
Now configure how the group will appear in TakeControl. Enter a name, choose an image if you like, and define the requested settings, such as the group objective, default currency, and default split method.
You can keep a name similar to the one used in Splitwise so the group is easy to recognize. This is also a good time to update outdated details, but most importantly, make sure the selected currency matches the group’s main currency.
4. Upload the CSV file
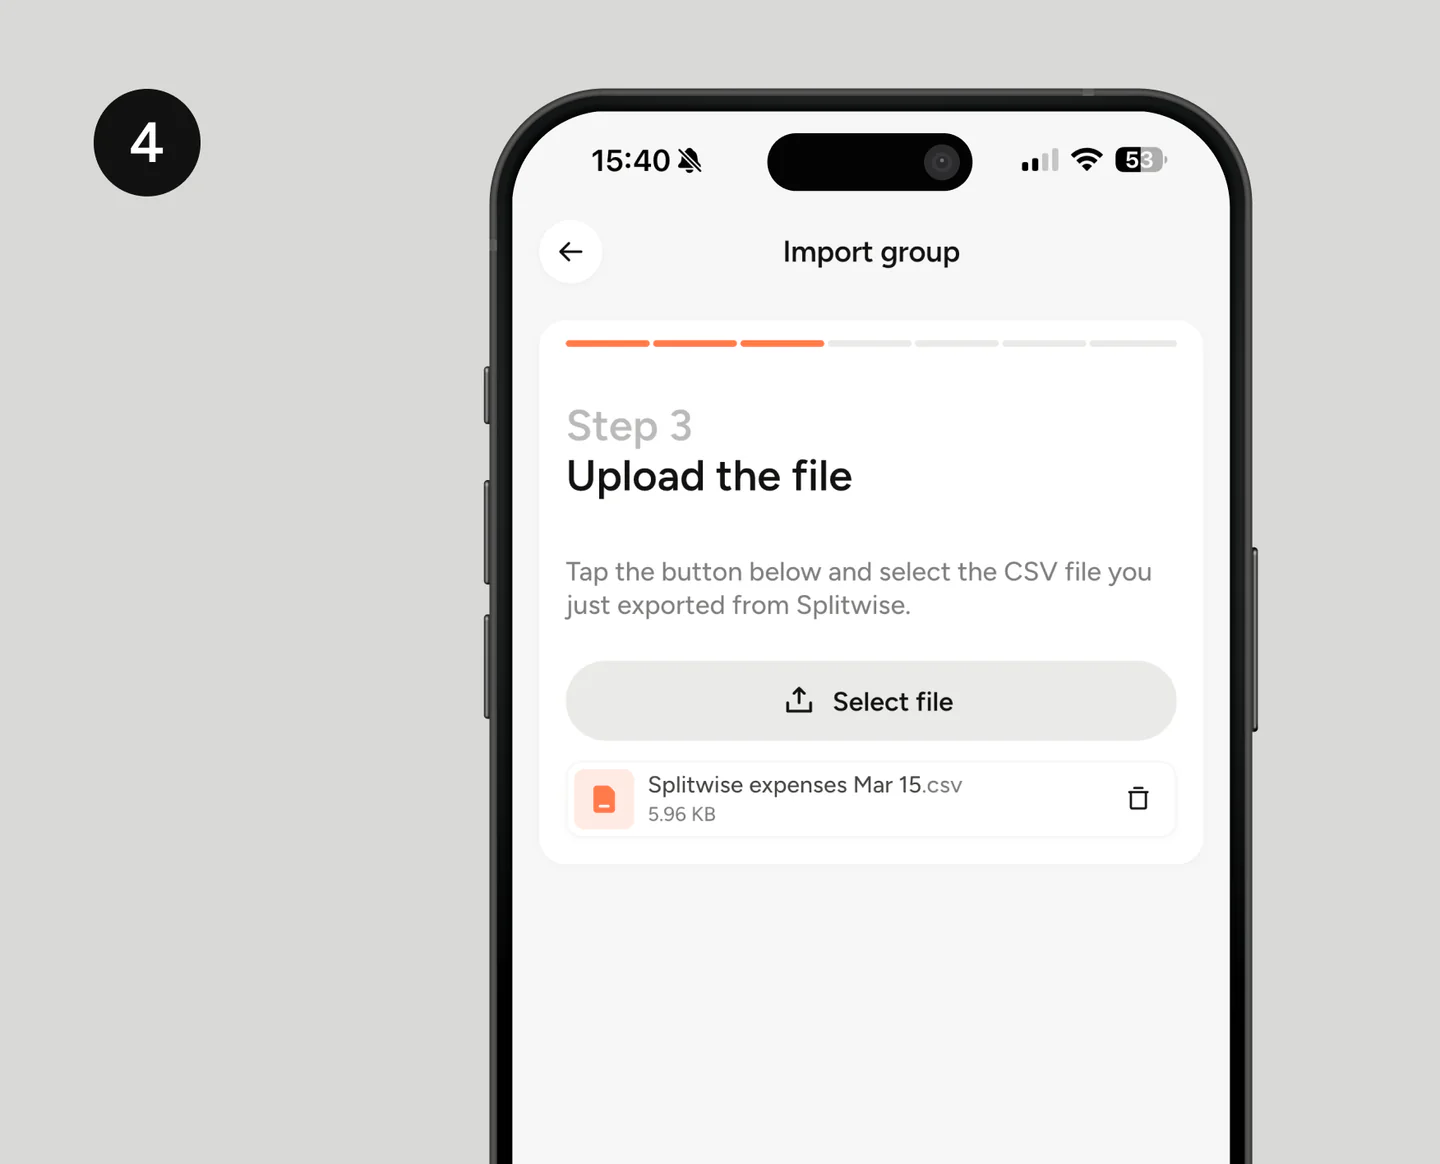
On the upload step, tap Select file. Your phone’s document picker will open; navigate to the folder where you saved the email attachment and choose the CSV exported from Splitwise.
Check the file name shown on the screen before continuing. If you exported more than one group, this prevents you from importing the wrong history.
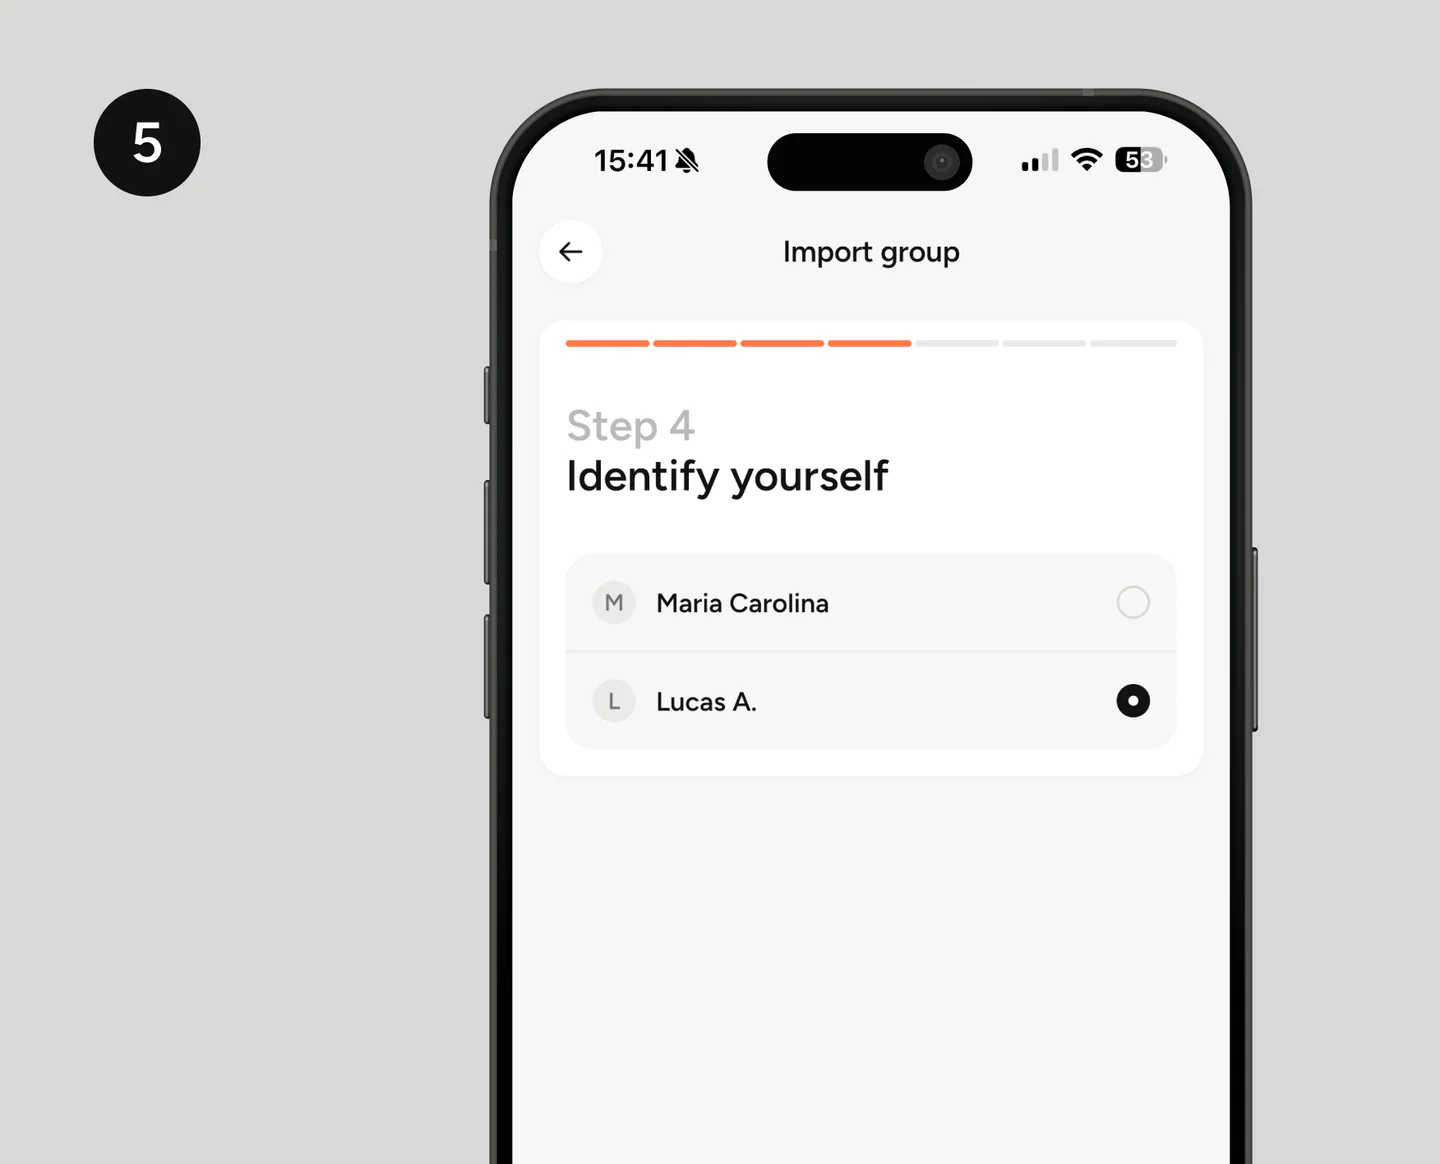
5. Identify which member is you
The CSV contains the names of the people who belonged to the group, but it does not automatically tell TakeControl which one matches your account. The app therefore shows the imported members and asks you to identify yourself.
Select your name exactly as it appeared in Splitwise. This link is important for correctly assigning the expenses you paid, received, or shared.
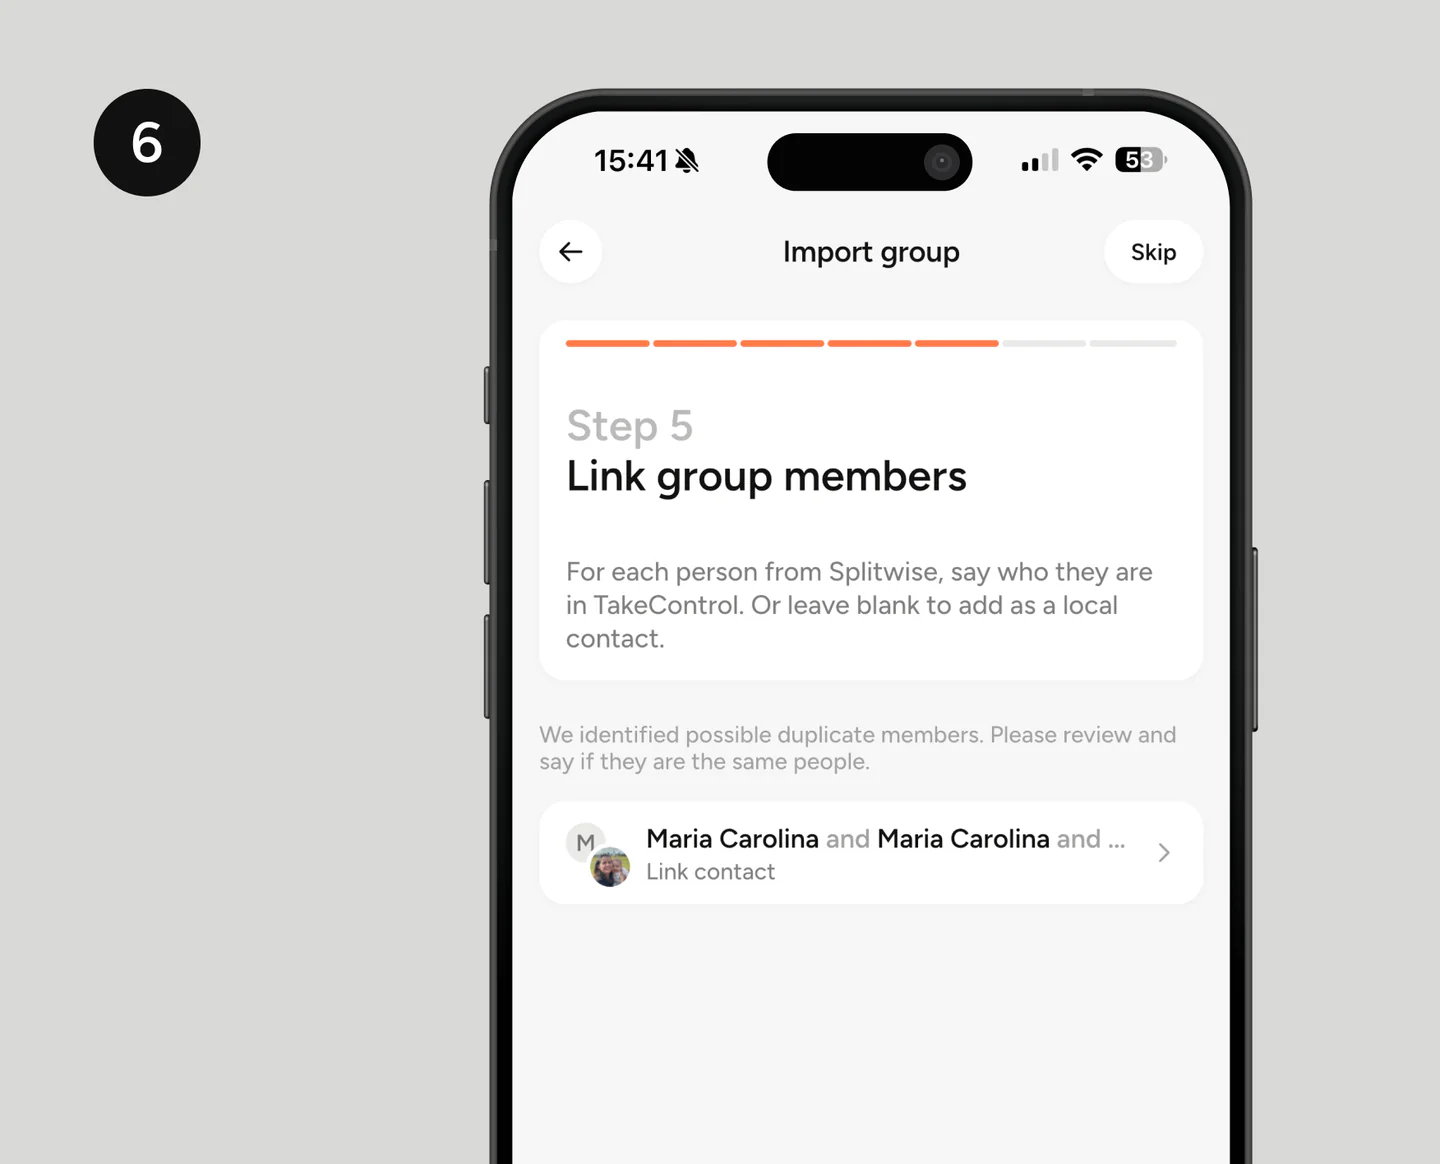
6. Link the group members
TakeControl then compares the imported names with people already in your contact list. For each Splitwise member, choose the matching TakeControl contact when there is a correct match.
Do not link people just because their names look similar. Check the photo and any other available information. If someone does not use TakeControl yet or is not in your list, leave the link blank; they can be added as a local contact.
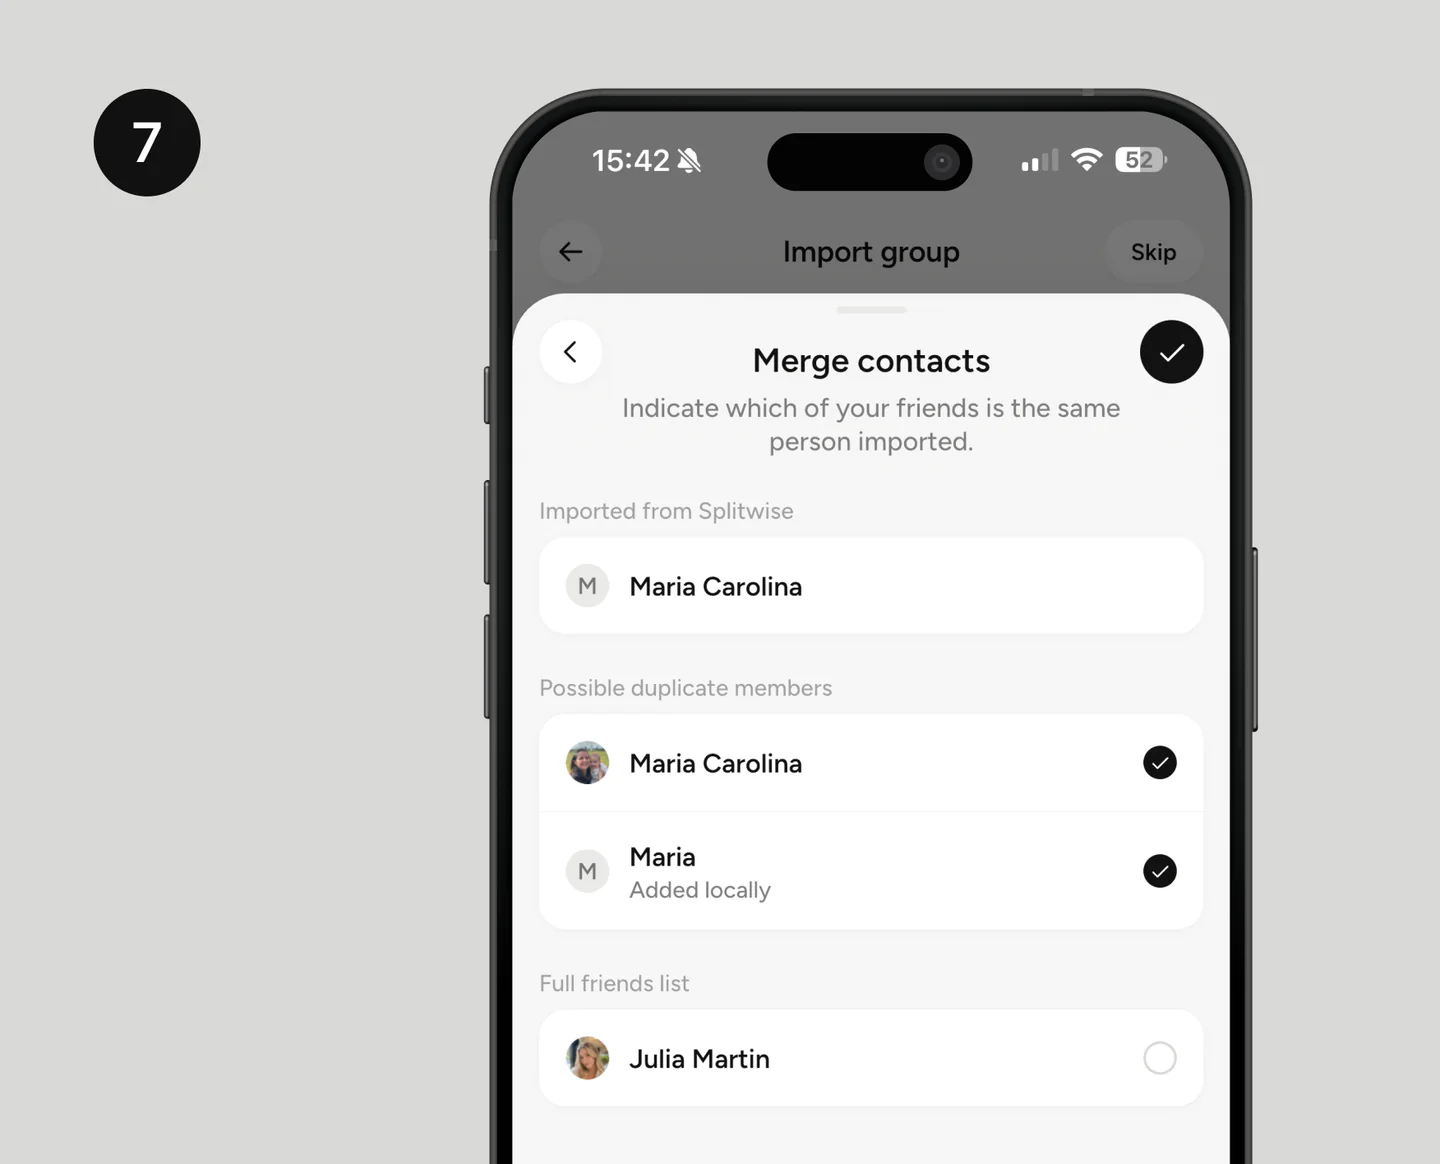
7. Review possible duplicate contacts
When the app finds more than one contact that may represent the same person, it opens a review screen. Compare the member imported from Splitwise with the suggestions and select only the records that truly belong to that person.
Confirm the match using the button in the top corner. Reviewing this now prevents one member from appearing twice in the group and having their expenses split across different profiles.
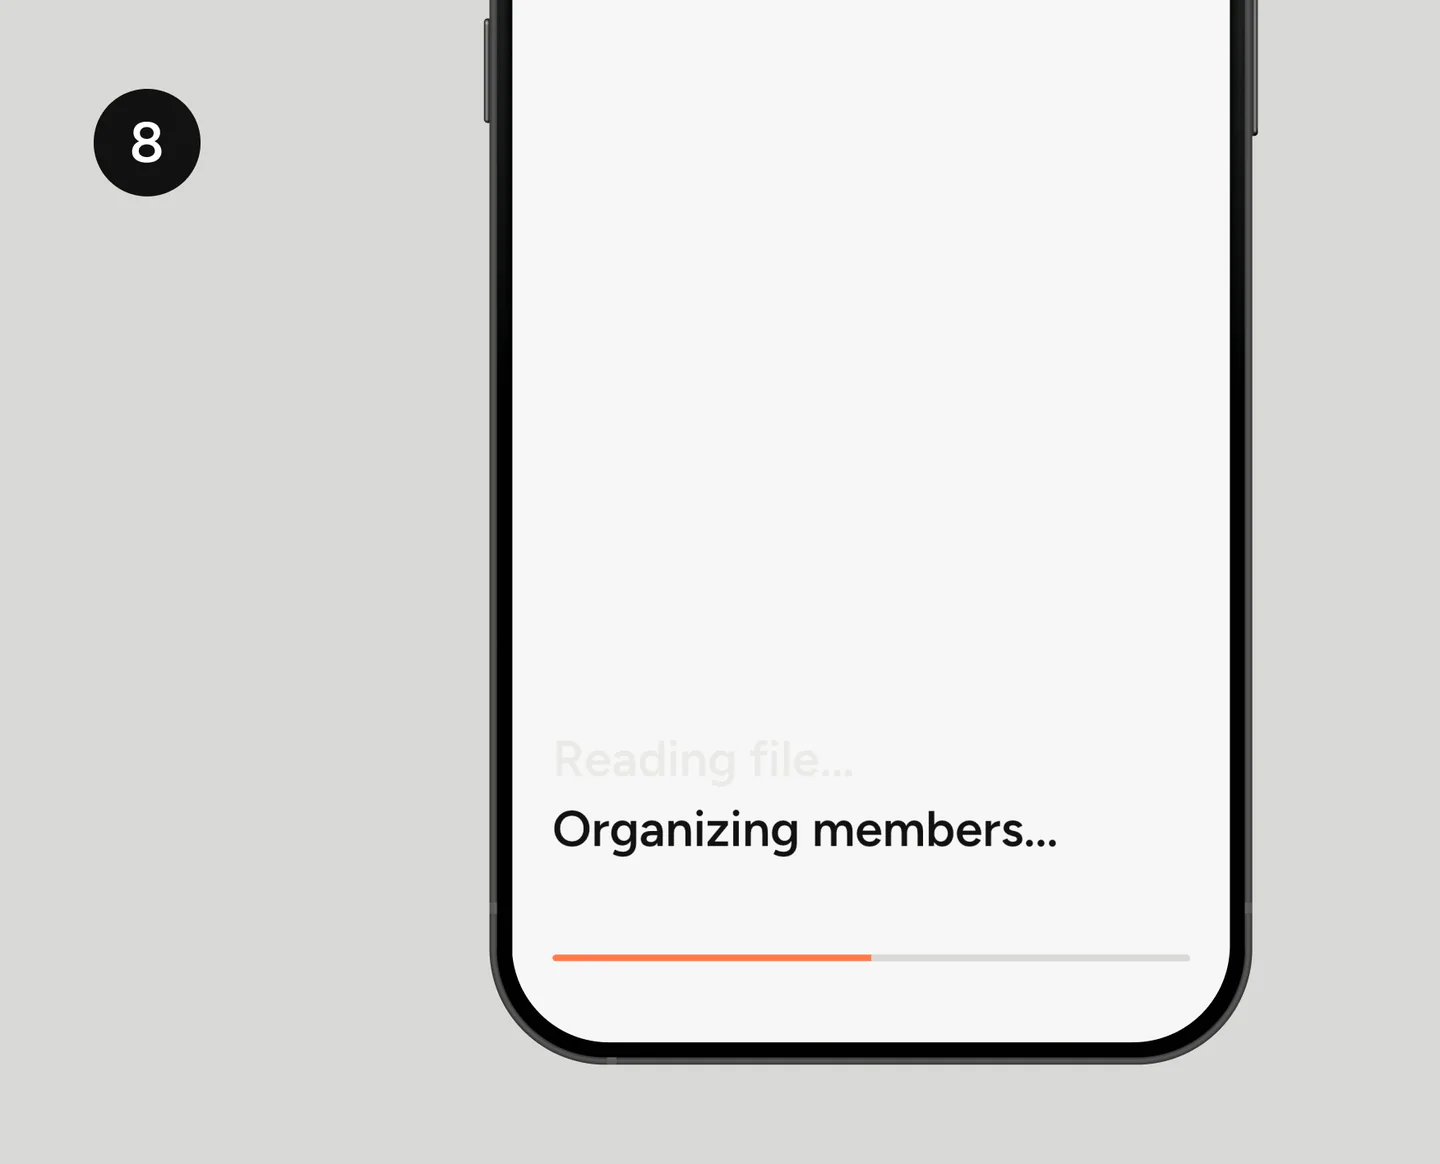
8. Wait for processing
With the members organized, TakeControl starts reading the file and building the group. At this stage, the app interprets the CSV transactions, organizes the members, and prepares the history for use.
Wait for the progress bar to finish. You do not need to select the file again while this screen is processing it.
9. Review the import result
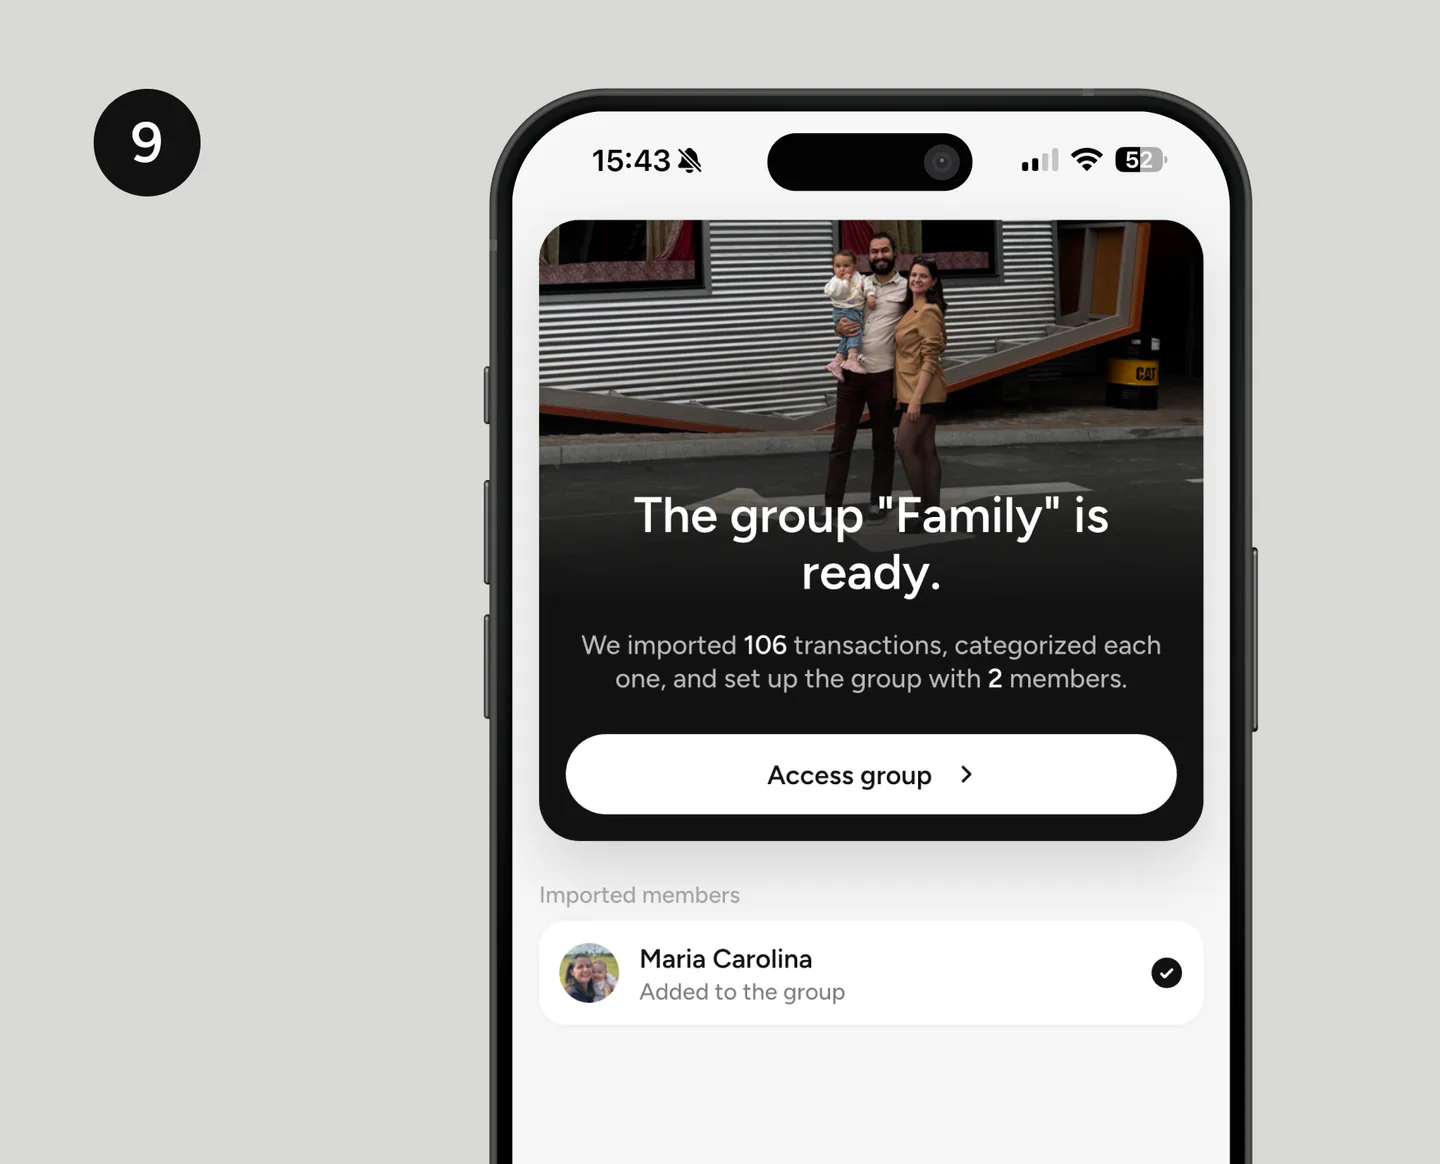
When the import is complete, TakeControl shows a summary with the group name, the number of imported transactions, and the members who were added. Review this information and tap Access group.
Inside the group, check a few recent expenses, the member list, and the balances. This quick review confirms that you uploaded the correct CSV and matched people to the expected profiles.
What to check after importing
Before adding new expenses, do a quick review:
- make sure the number of transactions looks consistent with the group’s history;
- open a few expenses and check their dates, amounts, payers, and splits;
- confirm that you were identified correctly;
- verify that the other members are linked to the right contacts;
- check the group’s currency and default settings;
- compare the final balances with those shown in Splitwise.
The CSV file works as a copy of the exported data. Exporting and importing do not delete the original Splitwise group, so you can keep the old history available while reviewing the result in TakeControl.
Common problems and how to solve them
The file does not appear in the picker
Open the email sent by Splitwise again, download the attachment, and save it to your phone’s file manager. Then return to TakeControl and look in Downloads or Recent.
The CSV is not recognized
Generate a new export directly from Splitwise. Use the original file without opening and resaving it in another spreadsheet editor, and make sure the extension is still .csv.
Some people have duplicate names
Use the linking and merging steps to indicate which records represent the same person. If you are unsure, keep the member as a local contact and review it later instead of linking them to the wrong profile.
Export and import one group at a time
Each CSV belongs to a specific group. If you have multiple groups in Splitwise, repeat the process for each one. This keeps their histories separate and makes it easier to verify members and balances.
10. Download TakeControl and import your group
After the import, the group is ready for new expenses in TakeControl. You keep the history as a reference and gain access to features such as voice entry, a built-in calculator, group budgets, widgets, and biometric lock.
If you are still comparing the two apps, read our TakeControl vs. Splitwise comparison. If you are ready to switch, choose the version for your phone and pick up where you left off.
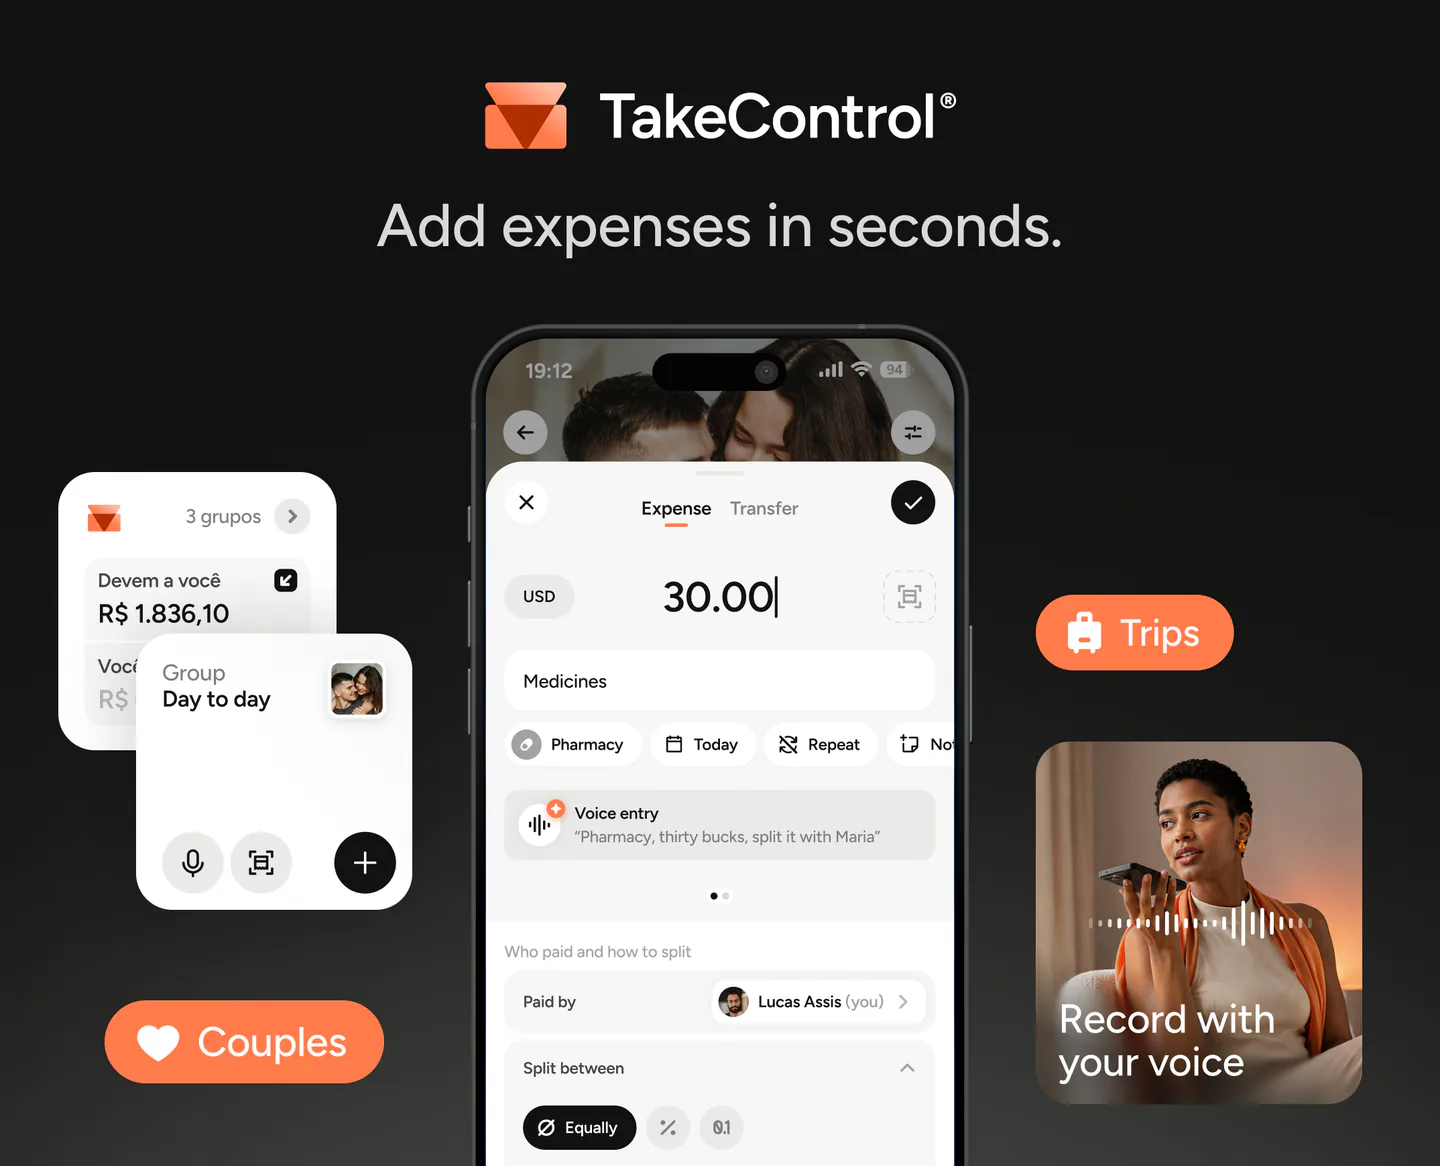

I created TakeControl to make splitting expenses between couples and on trips simpler. Here, I share tips, app updates, lessons learned, and content to make managing shared expenses easier.
Frequently asked questions
On the TakeControl home screen, tap the plus button and choose the Splitwise import option. Export the group from Splitwise as a CSV, save it on your phone, and follow the assistant to upload it, identify your profile, and link the other members.
Use the CSV format generated by Splitwise's own export option. To avoid read errors, do not rename columns or reorganize the spreadsheet before uploading it.
TakeControl uses the CSV to bring over the group's transaction history, including information such as dates, amounts, payers, participants, and splits recorded in the file.
They can remain as local contacts. If someone is already in your TakeControl contact list, you can link the imported record to the matching contact.
Yes. Export and import each group separately so that every CSV file is associated with the correct group in TakeControl.
